简单说一下
使用 stat 函数,通过文件的绝对路径或者相对路径的文件名去打开相应文件的属性
包含的头文件
1 | #include <sys/stat.h> |
参考函数
1 | int stat(const char *path, struct stat *buf); |
读取文件属性
1 | ... |
使用 stat 函数,通过文件的绝对路径或者相对路径的文件名去打开相应文件的属性
1 | #include <sys/stat.h> |
1 | int stat(const char *path, struct stat *buf); |
1 | ... |
目录是文件的列表,在Linux下对于目录来说是有系统调用可以使用来操作目录的。
目录的操作需要一个目录文件绝对路径或者当前目录的相对路径。
目录操作的大概过程为:打开目录,读取目录内容放入目录的结构体里面,然后对于结构体的数据进行呈现,最后不需要的时候关闭目录。
打开目录,会得到一个打开的目录文件描述符 DIR (一个无符号整数),读取目录内容需要目录的文件描述符.
DIR 作为 打开目录的文件描述符的宏参数
1 | DIR *opendir(const char *name); /* name: 目录的绝对路径或者相对路径 */ |
开始打开文件
1 | /** |
函数参考
1 | int readdir(unsigned int fd, struct old_linux_dirent *dirp, |
开始读取目录内容
1 | /** |
函数参考
1 | int closedir(DIR *dirp); |
关闭目录
1 | /** |
1 | $ man -k file | grep -i status |
1 | #include <sys/stat.h> |
stat1 | struct stat { |
1 | $ man -k direct | grep read |
1 | #include <dirent.h> |
dirent1 | struct dirent { |
首先是了解一下 iPod Library Access ,知道本地音乐文件的来源。接着就是知道如何使用播放器的类实例 MPMusicPlayerController ,去播放本地的音乐文件。这样基本就可以了,为了把Apple的文档使用多一些。尝试使用 Media item picker,深入再操作一下 iPod Library.
接触的类有:
其他参考类
需要头文件
1 | /** |
如果你想播放本地的音乐,首先你要知道它存放的位置,iPod Library 就是存放它的地方。
而这个地方也是一个数据库
先看图 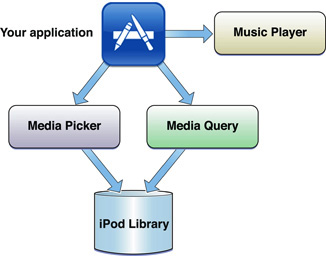
然后就是,我们的应用使用 Media Query 去获取 iPod Library 的音乐文件,然后应用交给 Music Player 去播放它们。
然后在对照上图,就可以大概知道一个情况了。
了解数据库的状态的改变,这需要 MPMediaLibraryDidChangeNotification 来作为通知。
返回的内容是一个 MPMediaItem 的数组,MPMediaItem 包含了一个媒体文件所有信息。
获取所有的音乐文件,我们还需要一个 MPMediaQuery, 这个类的实例可以用于初始化播放器的播放内容。
1 | MPMediaQuery *mySong = [MPMediaQuery songsQuery]; // 这样我们就可以得到了本地音乐文件的所有内容啦 |
想对 MPMediaQuery 有更多的使用有更多的了解
更多关于播放队列
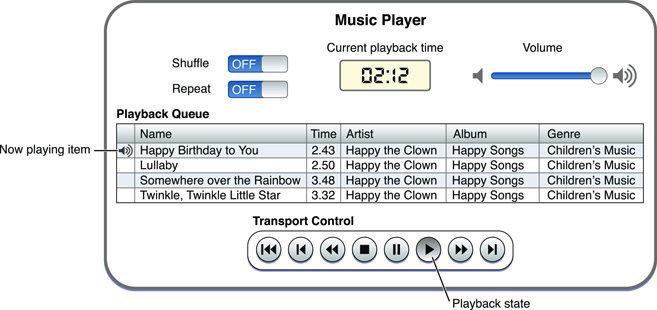
说好的播放器,就需要一个播放器实例啦。那就是 MPMusicPlayerController.
1
2/* 生成一个播放器的实例 */
MPMusicPlayerController *player = [MPMusicPlayerController applicationMusicPlayer];
但是,有了播放器,还需要播放的文件呢!上面我们的到了播放文件列表的一个 MPMediaQuery 实例。Just do it
1
2
3
4
5
6[player setQueueWithQuery: [MPMediaQuery songsQuery]];
/**
或者是
[player setQueueWithQuery: mySong];
*/
还没有完哦,如果播放器的播放状态改变了,我们也需要这个消息通知
1
2
3
4
5
6
7
8
9
10
11
12
13
14
15
16/**
( handle_NowPlayingItemChanged: ) 和 ( handle_PlaybackStateChanged: ) 是自定义的方法。
在注销的时候,记得也把通知给注销掉哦。。。。。
*/
// now playing
[notificationCenter addObserver:self
selector:@selector(handle_NowPlayingItemChanged:)
name:MPMusicPlayerControllerNowPlayingItemDidChangeNotification object:_myPlayer];
// playback state change
[notificationCenter addObserver:self
selector:@selector(handle_PlaybackStateChanged:)
name:MPMusicPlayerControllerPlaybackStateDidChangeNotification object:_myPlayer];
[player beginGeneratingPlaybackNotifications]; // player set the notification
然后就可以开始播放了。。。
1
2
3
4
5
6
7
8
9
10
11
12
13
14
15
16
17/**
遵循了 `MPMediaPlayback` Delegate,
*/
[player play]; // 播放
[_myPlayer pause]; // 暂停
[_myPlayer stop]; // 停止
[_myPlayer skipToBeginning]; // 重新开始播放
[_myPlayer skipToNextItem]; // 下一首
[_myPlayer skipToPreviousItem]; // 上一首
... (还有一些都在这个实例里面的)
到这里基本就没有了,一个简单的没有界面的播放器就完成了
Using a media query to access the device iPod library 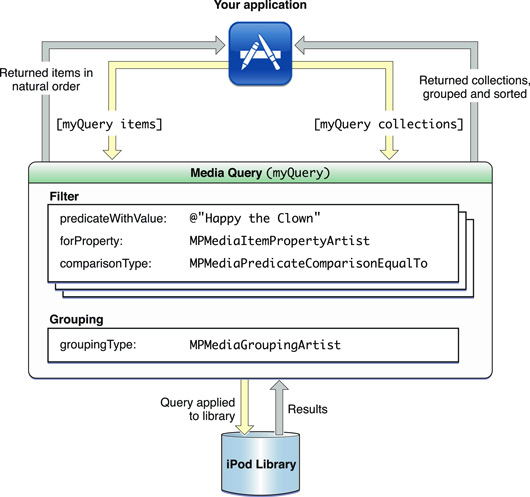
上文我们得到的 MPMediaQuery 的实例 mySong.和图中的 myQuery 一样的。
media query 提供了一个对于 iPod Library 的一个搜索描述,告诉数据库如何去获取相应的 media item,并且还有如何组织这些 item
有两个配置属性
- The `filter` is the description of what to retrieve. The filter is optional; a filterless query matches the entire iPod library.

- The `grouping` type is an optional key that specifies the arrangement to use for retrieved collections of media items.
有两种方法去设置播放的队列内容
Use a media item collection
1 | /** |
Use a media query, which implicitly defines a collection
1 | /** |
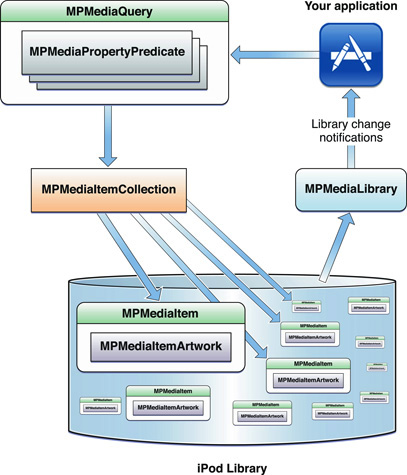
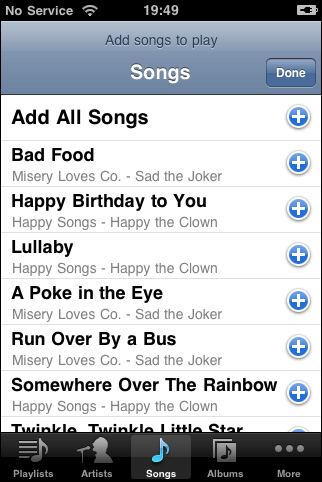
iPod Library Access Programming Guide
Storyboard ,然后对其进行创建和配置,使得可以最干净(干净的意思是没有任何代码的实现,类似于什么都没有做的一个View)的启动。segue ,对其进行使用segue 中去传递数据Storyboard 的一些讨论Storyboard is IOS 的一个特性功能, 它可以让你所有的初始化和布局视图控制器(View Controller)在一个类似于 XIB 的文件中。
StoryBoard 是苹果在 iOS 5 中引入的新技术方案,目的是给纷繁复杂的 nib、xib 们一个温暖的家,让他们之间的关系更直观地展示出来,并提供了一种新的页面间跳转方式 segue。
StoryBoard 的本质是一个 XML 文件,描述了若干窗体、组件、Auto Layout 约束等关键信息。
苹果官方是推荐我们将所有的UI都使用Storyboard去搭建,Storyboard也是一个很成熟的工具了。使用Storyboard去搭建所有界面,我们可以很迅捷地搭建出复杂的界面,也就是说能为我们节省大量的时间。我们还可以很直观地看出各个界面之间的关系,修改起来也很方便。将来如果遇到需要作修改的地方,我们只需要找到相对应的Storyboard就可以了,比起以前来说,快捷了不少。
>
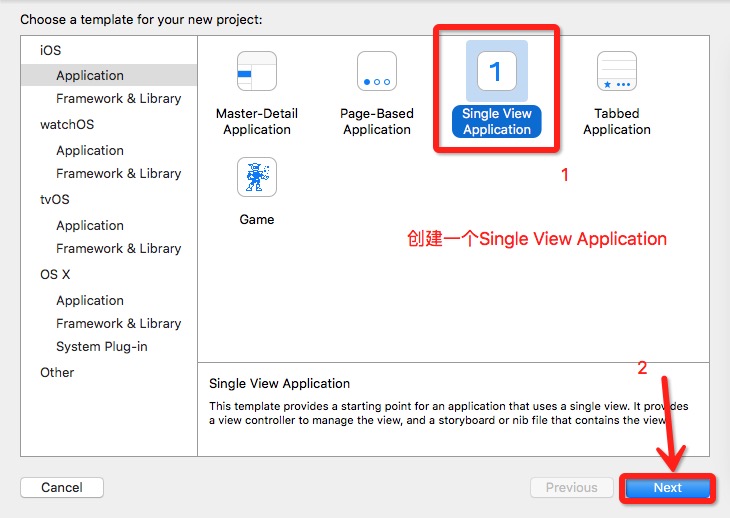
>
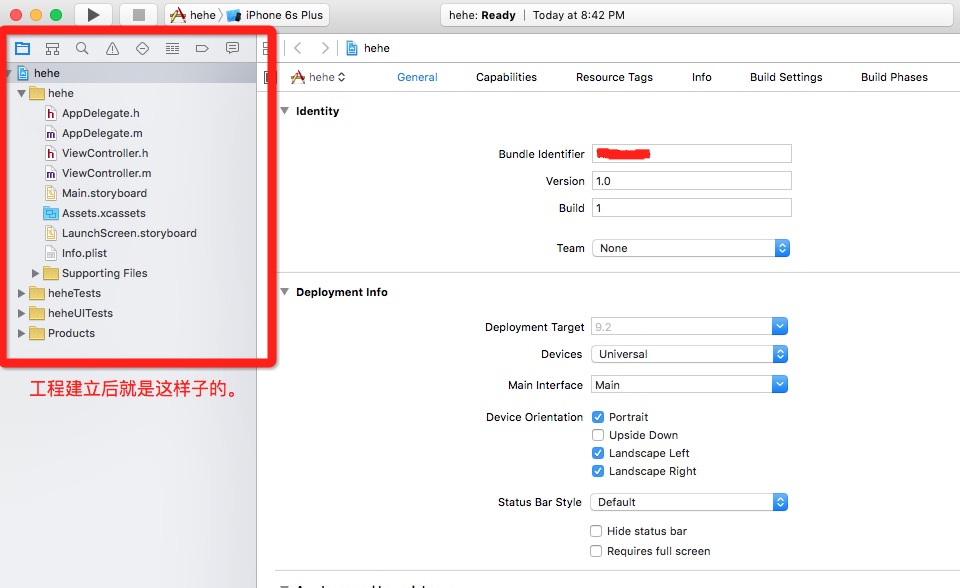
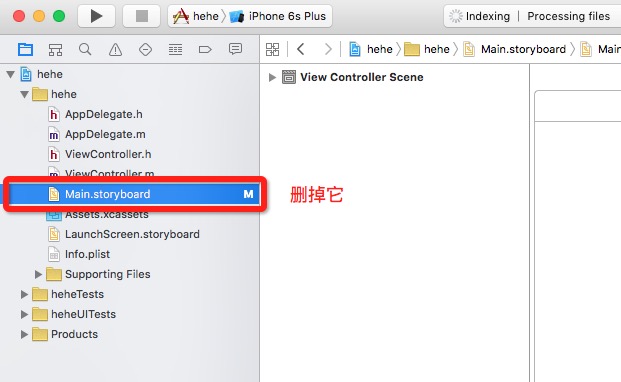
为了能够完全的了解启动的步骤,我们把 Main.storyBoard 删掉
>
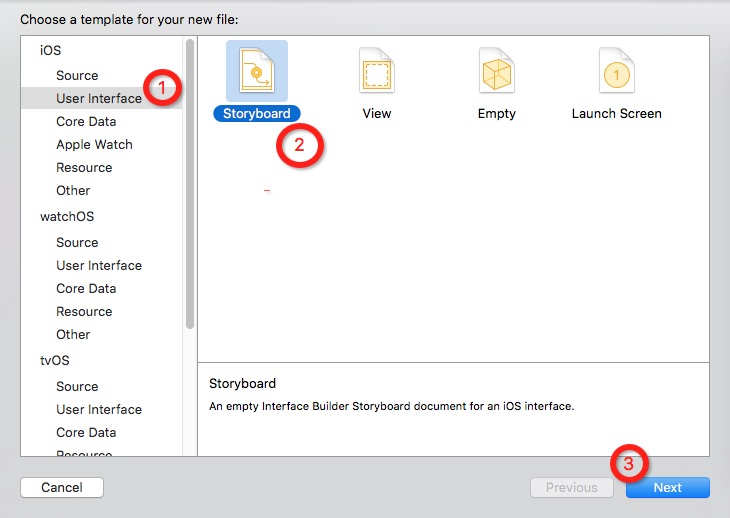
删掉后我们来创建一个 StoryBoard
>
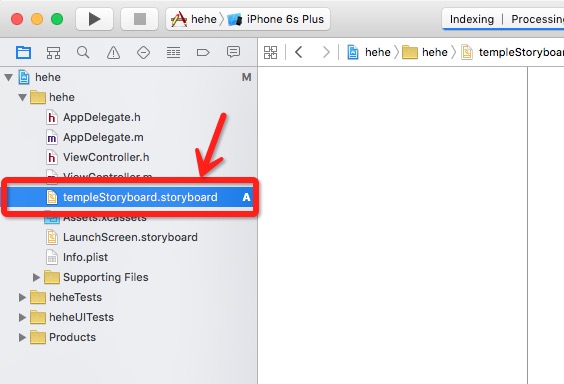
命名为 templeStoryboard
>
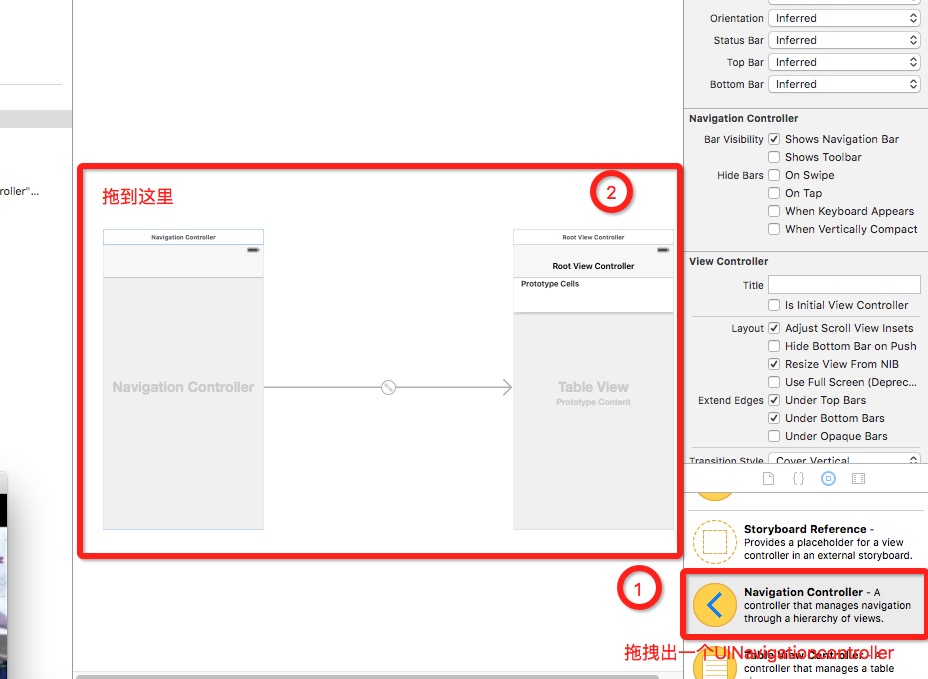
然后拖一个 Navigation Controller 过来
>
navigation 作为入口的 controller ,点击 navigation 的 view ,然后设置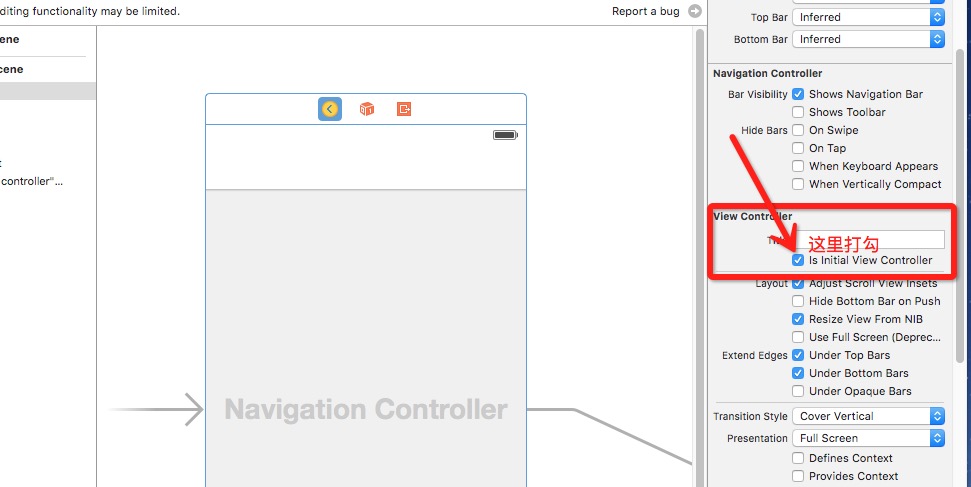
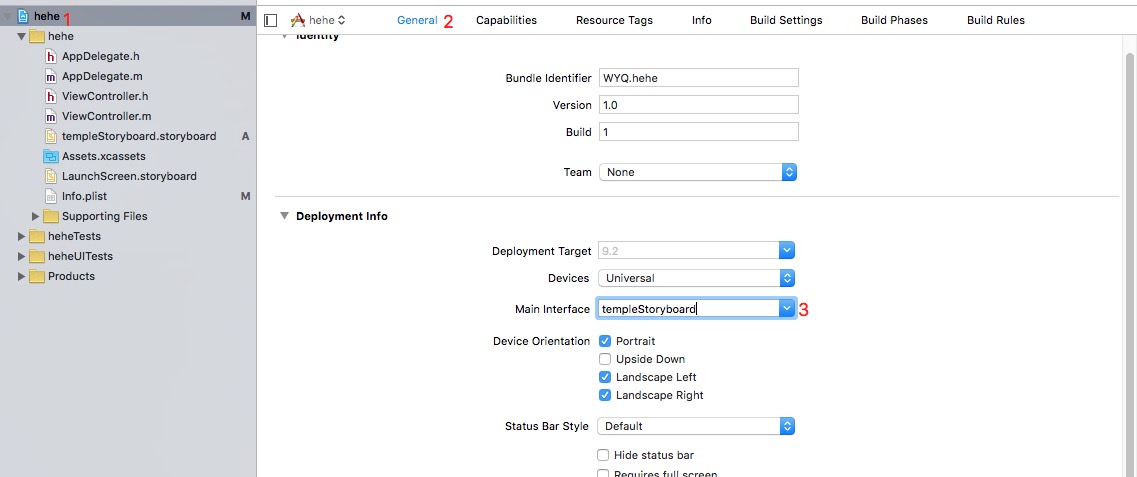
启动前设置一下 Main interface
>
效果
>
这个时候,简单的配置就完成了
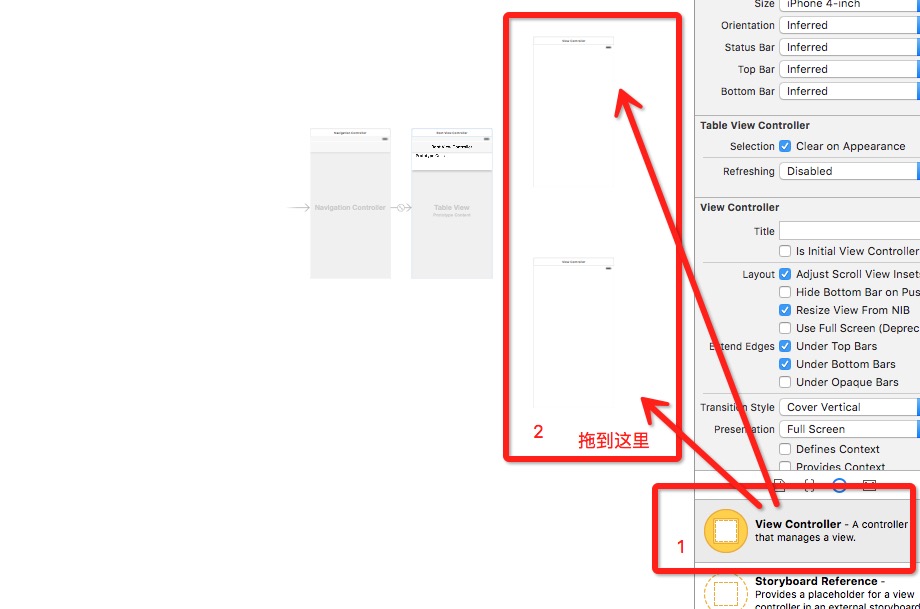
拖出两个 View Controller
>
从 table view 那边,按住 Control 键,使用鼠标拖到某一个 view controller
>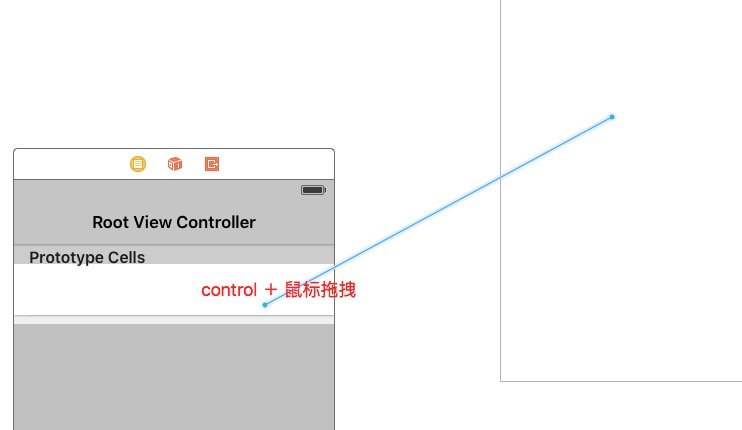
松开后就会出现一个列表,选择 push,或者 modal,然后就可以实现简单的事件出发了。
对于 modal 的视图来说没有返回,所以需要代码来使它消失
1 | [self.presentingViewController dismissViewControllerAnimated:YES |
1 | /** |
storyboard 在我们看起来挺不错的, 但是并不是非常的有用.
优势
劣势
Storyboards disrupt the flow of programming. Let’s say you are writing a view controller and adding the code for a button that presents a view controller modally.
You can do that pretty easily in code – alloc and init the view controller, and send presentViewController:animated:completion: to self. With storyboards, you have to load up the storyboard file, drag some stuff onto the canvas, set the Class in the identity inspector, connect the segue, and then configure the segue.
Storyboards sacrifice flexibility and control for ease of use. The work required to add advanced functionality to the basic functionality of a storyboard is often more than the work required to put together the advanced and basic functionality in code.
Storyboards always create new view controller instances. Each time you perform a segue, a new instance of the destination view controller is created. Sometimes, though, you would like to keep a view controller around instead of destroying it each time it disappears off the screen. Storyboarding does not allow you to do this.
Overall, storyboards make easy code easier and difficult code more difficult. We do not use them in this book, and we do not typically use them when writing our own applications. However, Apple seems to be pushing them harder in each release of Xcode, so you might one day decide that a particular application would benefit from storyboarding.
3.0.4
关于 Serializer
1 |
|
发送数据和接收数据的序列化编码封装
AFHTTPRequestSerializer
AFHTTPRequestSerializer conforms to the AFURLRequestSerialization & AFURLResponseSerialization protocols, offering a concrete base implementation of query string / URL form-encoded parameter serialization and default request headers, as well as response status code and content type validation.
Any request or response serializer dealing with HTTP is encouraged to subclass AFHTTPRequestSerializer in order to ensure consistent default behavior.
AFHTTPResponseSerializer
AFHTTPResponseSerializer conforms to the AFURLRequestSerialization & AFURLResponseSerialization protocols, offering a concrete base implementation of query string / URL form-encoded parameter serialization and default request headers, as well as response status code and content type validation.
Any request or response serializer dealing with HTTP is encouraged to subclass AFHTTPResponseSerializer in order to ensure consistent default behavior.
AFJSONRequestSerializer
AFJSONRequestSerializer is a subclass of AFHTTPRequestSerializer that encodes parameters as JSON using NSJSONSerialization, setting the Content-Type of the encoded request to application/json.
AFPropertyListRequestSerializer
AFPropertyListRequestSerializer is a subclass of AFHTTPRequestSerializer that encodes parameters as JSON using NSPropertyListSerializer, setting the Content-Type of the encoded request to application/x-plist.
AFPropertyListResponseSerializer
AFPropertyListResponseSerializer is a subclass of AFHTTPResponseSerializer that validates and decodes XML responses as an NSXMLDocument objects.
By default, AFPropertyListResponseSerializer accepts the following MIME types:
- application/x-plist
AFXMLParserResponseSerializer
AFXMLParserResponseSerializer is a subclass of AFHTTPResponseSerializer that validates and decodes XML responses as an NSXMLParser objects.
By default, AFXMLParserResponseSerializer accepts the following MIME types, which includes the official standard, application/xml, as well as other commonly-used types:
- application/xml
- text/xml
AFXMLDocumentResponseSerializer
AFXMLDocumentResponseSerializer is a subclass of AFHTTPResponseSerializer that validates and decodes XML responses as an NSXMLDocument objects.
By default, AFXMLDocumentResponseSerializer accepts the following MIME types, which includes the official standard, application/xml, as well as other commonly-used types:
- application/xml
- text/xml
AFJSONResponseSerializer
AFJSONResponseSerializer is a subclass of AFHTTPResponseSerializer that validates and decodes JSON responses.
By default, AFJSONResponseSerializer accepts the following MIME types, which includes the official standard, application/json, as well as other commonly-used types:
- application/json
- text/json
- text/javascript
AFImageResponseSerializer
AFImageResponseSerializer is a subclass of AFHTTPResponseSerializer that validates and decodes image responses.
By default, AFImageResponseSerializer accepts the following MIME types, which correspond to the image formats supported by UIImage or NSImage:
- image/tiff
- image/jpeg
- image/gif
- image/png
- image/ico
- image/x-icon
- image/bmp
- image/x-bmp
- image/x-xbitmap
- image/x-win-bitmap
Node 是一个服务器端 JavaScript 解释器,它将改变服务器应该如何工作的概念。它的目标是帮助程序员构建高度可伸缩的应用程序,编写能够处理数万条同时连接到一个(只有一个)物理机的连接代码。
Node.js® is a JavaScript runtime built on Chrome’s V8 JavaScript engine. Node.js uses an event-driven, non-blocking I/O model that makes it lightweight and efficient. Node.js’ package ecosystem, npm, is the largest ecosystem of open source libraries in the world.
Homebrew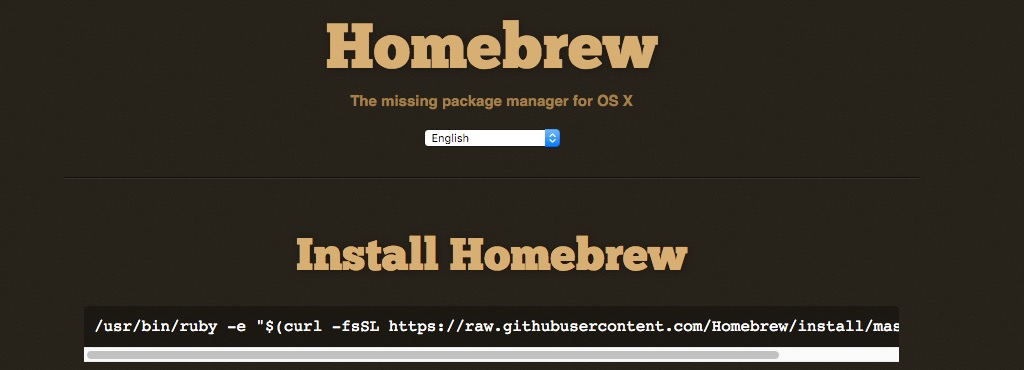
安装 node
1 | $ brew install node |
这样在 Mac 下的 Node 就安装好了
下载安装文件
安装Node
双击它,默认是安装在C:\Program Files\nodejs下面
打开C:\Program Files\nodejs目录你会发现里面自带了npm,直接用npm安装相环境既可进入node.js command prompt 命令窗口进入nodejs 安装目录 C:\Program Files\nodejs
键入命令:cd C:\Program Files\nodejs 既可
现在开始安装相关环境
键入命令:npm install express 回车等待安装 express……..
键入命令:npm install mysql 回车等待安装 mysql……..
……..安装什么组件,取决于环境搭建需求
默认情况下上述组件都是安装在C:\Program Files\nodejs\node_modules文件夹下 这也是nodejs相关组件的自动查找路径
这样在 Windows 下的 Node 就安装好了
下载 Node
1 | $ wget http://nodejs.org/dist/v0.8.7/node-v0.8.7.tar.gz |
解压文件
1 | $ tar -zxvf node-v0.8.7.tar.gz |
检查所需要配置
1 | $ ./configure |
1 | $ yum install gcc-c++ |
进行安装(时间比较长):
1 | $ make install |
检查是否成功安装,输入命令:
1 | $ node -v |
这样在 Linux 下的 Node 就安装好了
安装完 node 后 npm 也就安装完了

1 | $ which git |
使用homebrew来安装 Git - command line
安装 homebrew,安装后
1 | $ which brew |
然后就安装好了。。。

官方文档的方式安装 - http://git-scm.com/
实话实说,Windows是最烂的开发平台,如果不是开发Windows游戏或者在IE里调试页面,一般不推荐用Windows。不过,既然已经上了微软的贼船,也是有办法安装Git的。
– 来源于廖雪峰的 Git 教学
Windows下要使用很多Linux/Unix的工具时,需要Cygwin这样的模拟环境,Git也一样。Cygwin的安装和配置都比较复杂,就不建议你折腾了。不过,有高人已经把模拟环境和Git都打包好了,名叫msysgit,只需要下载一个单独的exe安装程序,其他什么也不用装,绝对好用。
msysgit是Windows版的Git,从http://msysgit.github.io/下载,然后按默认选项安装即可。
安装完成后,在开始菜单里找到“Git”->“Git Bash”,蹦出一个类似命令行窗口的东西,就说明Git安装成功!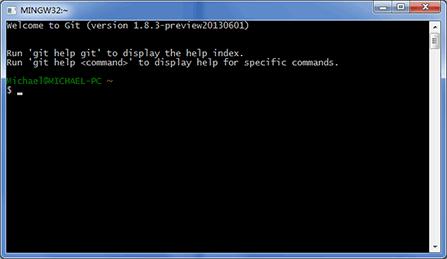
安装完成后,还需要最后一步设置,在命令行输入:
1 | $ git config --global user.name "Your Name" |
因为Git是分布式版本控制系统,所以,每个机器都必须自报家门:你的名字和Email地址。你也许会担心,如果有人故意冒充别人怎么办?这个不必担心,首先我们相信大家都是善良无知的群众,其次,真的有冒充的也是有办法可查的。
注意git config命令的–global参数,用了这个参数,表示你这台机器上所有的Git仓库都会使用这个配置,当然也可以对某个仓库指定不同的用户名和Email地址。
Centos安装Git1
$ sudo yum install -y git //然后输入你的 password
安装过程1
2
3
4
5
6
7
8
9
10
11
12
13
14
15
16
17
18
19
20
21
22
23
24
25
26
27
28
29
30
31
32
33
34
35
36
37
38
39
40
41
42
43
44
45
46
47
48
49
50
51
52
53
54
55
56
57
58
59
60
61
62
63
64
65
66
67
68
69
70
71
72
73
74
75
76
77
78
79
80
81
82
83
84
85
86
87
88
89
90
91
92
93
94
95
96
97
98
99
100
101
102
103
104
105
106
107
108
109
110
111
112
113
114
115
116Loaded plugins: fastestmirror
Loading mirror speeds from cached hostfile
* base: mirrors.btte.net
* extras: mirrors.pubyun.com
* updates: mirrors.btte.net
Setting up Install Process
Resolving Dependencies
--> Running transaction check
---> Package git.x86_64 0:1.7.1-3.el6_4.1 will be installed
--> Processing Dependency: perl-Git = 1.7.1-3.el6_4.1 for package: git-1.7.1-3.el6_4.1.x86_64
--> Processing Dependency: rsync for package: git-1.7.1-3.el6_4.1.x86_64
--> Processing Dependency: perl(Git) for package: git-1.7.1-3.el6_4.1.x86_64
--> Processing Dependency: perl(Error) for package: git-1.7.1-3.el6_4.1.x86_64
--> Processing Dependency: openssh-clients for package: git-1.7.1-3.el6_4.1.x86_64
--> Running transaction check
---> Package openssh-clients.x86_64 0:5.3p1-112.el6_7 will be installed
--> Processing Dependency: openssh = 5.3p1-112.el6_7 for package: openssh-clients-5.3p1-112.el6_7.x86_64
--> Processing Dependency: libedit.so.0()(64bit) for package: openssh-clients-5.3p1-112.el6_7.x86_64
---> Package perl-Error.noarch 1:0.17015-4.el6 will be installed
---> Package perl-Git.noarch 0:1.7.1-3.el6_4.1 will be installed
---> Package rsync.x86_64 0:3.0.6-12.el6 will be installed
--> Running transaction check
---> Package libedit.x86_64 0:2.11-4.20080712cvs.1.el6 will be installed
---> Package openssh.x86_64 0:5.3p1-94.el6 will be updated
--> Processing Dependency: openssh = 5.3p1-94.el6 for package: openssh-server-5.3p1-94.el6.x86_64
---> Package openssh.x86_64 0:5.3p1-112.el6_7 will be an update
--> Running transaction check
---> Package openssh-server.x86_64 0:5.3p1-94.el6 will be updated
---> Package openssh-server.x86_64 0:5.3p1-112.el6_7 will be an update
--> Finished Dependency Resolution
Dependencies Resolved
================================================================================
Package Arch Version Repository Size
================================================================================
Installing:
git x86_64 1.7.1-3.el6_4.1 base 4.6 M
Installing for dependencies:
libedit x86_64 2.11-4.20080712cvs.1.el6 base 74 k
openssh-clients x86_64 5.3p1-112.el6_7 updates 438 k
perl-Error noarch 1:0.17015-4.el6 base 29 k
perl-Git noarch 1.7.1-3.el6_4.1 base 28 k
rsync x86_64 3.0.6-12.el6 base 335 k
Updating for dependencies:
openssh x86_64 5.3p1-112.el6_7 updates 274 k
openssh-server x86_64 5.3p1-112.el6_7 updates 324 k
Transaction Summary
================================================================================
Install 6 Package(s)
Upgrade 2 Package(s)
Total download size: 6.1 M
Downloading Packages:
--------------------------------------------------------------------------------
Total 1.8 MB/s | 6.1 MB 00:03
Running rpm_check_debug
Running Transaction Test
Transaction Test Succeeded
Running Transaction
Updating : openssh-5.3p1-112.el6_7.x86_64 1/10
Installing : 1:perl-Error-0.17015-4.el6.noarch 2/10
Installing : libedit-2.11-4.20080712cvs.1.el6.x86_64 3/10
Installing : openssh-clients-5.3p1-112.el6_7.x86_64 4/10
Installing : rsync-3.0.6-12.el6.x86_64 5/10
Installing : perl-Git-1.7.1-3.el6_4.1.noarch 6/10
Installing : git-1.7.1-3.el6_4.1.x86_64 7/10
Updating : openssh-server-5.3p1-112.el6_7.x86_64 8/10
Cleanup : openssh-server-5.3p1-94.el6.x86_64 9/10
Cleanup : openssh-5.3p1-94.el6.x86_64 10/10
Verifying : openssh-clients-5.3p1-112.el6_7.x86_64 1/10
Verifying : perl-Git-1.7.1-3.el6_4.1.noarch 2/10
Verifying : 1:perl-Error-0.17015-4.el6.noarch 3/10
Verifying : rsync-3.0.6-12.el6.x86_64 4/10
Verifying : libedit-2.11-4.20080712cvs.1.el6.x86_64 5/10
Verifying : openssh-5.3p1-112.el6_7.x86_64 6/10
Verifying : git-1.7.1-3.el6_4.1.x86_64 7/10
Verifying : openssh-server-5.3p1-112.el6_7.x86_64 8/10
Verifying : openssh-5.3p1-94.el6.x86_64 9/10
Verifying : openssh-server-5.3p1-94.el6.x86_64 10/10
Installed:
git.x86_64 0:1.7.1-3.el6_4.1
Dependency Installed:
libedit.x86_64 0:2.11-4.20080712cvs.1.el6
openssh-clients.x86_64 0:5.3p1-112.el6_7
perl-Error.noarch 1:0.17015-4.el6
perl-Git.noarch 0:1.7.1-3.el6_4.1
rsync.x86_64 0:3.0.6-12.el6
Dependency Updated:
openssh.x86_64 0:5.3p1-112.el6_7 openssh-server.x86_64 0:5.3p1-112.el6_7
Complete!
安装完成后
1 | $ which git |
OK, 其他版本的Linux大概也就是这样的了